Thursday, November 26, 2009

Actual fun amidst boat stress


Yep, I rode that camel


This is a guy who spun on stage without stop for a little over 10 minutes!


Arabian guards on horse back!

Check out the racing at www.rc44.com

Boat work in 93 degrees or is it 30??

There are no Lidos in Dubai, and it's a lot more difficult to re-rig an RC44 than a lido. Still, there's time for a little snowboarding!


The Emirates mall indoor ski slope!


Sunday, November 15, 2009

Boga, (boat Yoga)


Its a new yoga pose, fitting under the lip of the lido's deck to sand and laminate.

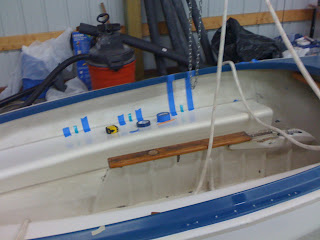
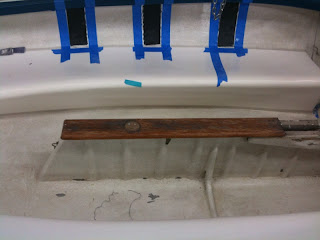
This morning Lisa joined me and we measured out the positions of the boat's hull-to-deck supports. First, it gets laminated. That was the step we set out to accomplish today.

We sanded down to fiberglass, wet up two layers of 200 gram cloth with the weave at +/-45 degrees. I chose to wet out the layers at the same time, this saved half the work as we only had to cut once, wet out once, and laminate onto the boat once.

Immediately apply peel-ply and brush onto the surface of the carbon. Make sure to clean with acetone and prime the surface of the boat with epoxy before laminating onto it. Laminate needs to be properly wet-out and use a brush with clipped bristles or roller to make sure there are no air bubbles.

Here's how it turned out.


This process is not finished. We need to manufacture supports and bond them on as well.

Also on the plate today, the painting of the transom. We threw on the first coat and used the same stuff I used for the hull.
Its an excellent barrier coat, performs like a primer, and sets up very very hard. If not wet-sanded in hull applications within 3 days, it becomes an absolute chore.

Here's the transom sealed with epoxy.

Gave it a good sand and applied first coat.
Also, we put on the preventers for the shrouds using a Ronstan tang and some dyneema. Lisa did her first splice, beautiful eh?

Saturday, November 14, 2009

Stay Tuned

This has been a slow week. I work too much and I haven't had time to work on the boat since painting it, except to wet-sand.

Wet sanding grit began at 400 and I finished with 800 grit. Then I intend to burnish with fine rubbing compound and coat with McLube Hullkote.

Tomorrow, I will have a post with some more rigging details, painting of the transom, and the lamination process that begins the construction of hull, deck supports. After that, there will be a two week hiatus because I have to travel to Dubai to sail in a regatta. I'll probably post a few pics from that as it might be a refreshing addition to the blog, but I won't be able to do more work on my lido until December. Thanks for the interest and support. Stay tuned!

Sunday, November 8, 2009

Painting

Ok, so it's not a very creative title, but trust me; this has been the most exciting achievement on my boat so far!

What an accomplishment! If you're willing to do all the moving, sanding, and prepping required, and know a friend who will spray paint for beer, this adventure can cost as little as... $33.17!

Alright, I could have attempted the painting with a little instruction, but it was good to have a friend who was confident and experienced operating the paint gun. Rrrright then, pictures.


Ok, first off, I did sand the boat four more times. Twice with 120 grit. It's very important to note, that I finished the sanding with 2 rounds of 220 grit! Not 120!!

Having the right grit is important. It depends on the paint you use as well as the method, spray vs. Rolling. However, too fine a grit will inhibit the paint and keep it from adhering properly. Too coarse a grit will leave you with a streaky result. In my case, 220 was an optimum compromise.


Sanded and cleaned with acetone.


There he goes...


Two coats later and she's done. Wow, as I said before, this is very exciting!


What a result!


Ok, not to paint on the philosophy here, but it is very important to FINISH boat work. This coating will make the boat as slick as a day-old fish carcass on a slip'n slide, but it won't matter at all if I get an over early, miss a shift, or mess up my roll-tacks. My motivation is high to refurbish this boat, because I need to have it complete and sailing if Lisa and I are to get the practice on the water that is so very essential to any success in regattas.
Next, I make foils and reinforce the deck. Stay tuned, and please, leave comments!

Friday, November 6, 2009

Let's try this

For the vang, I'm going to try and avoid a new fitting. This means that I'll use splice trickery to figure something out.

I would encourage everyone to learn how to splice modern 12-strand ropes such as dyneema or vectran. It's easy to do and only requires a needle, thread, and some bendy wire for a fid.

Sites like samsonrope.com have free splicing instructions.

Ok for the vang, without an actual "vang fitting" I had to go back to the mainsheet for a point to secure.


The thing loops through the fitting and around the boom.


Travels down the boom...


Then it loops around the boom again. I had to measure a bit to get the length right, because of the angle caused by the vang itsself.


Then a little Karver block for coolness. Who said old boats can't be hip?


This weekend I paint the boat. I might not be able to resist sanding it ten more times. All that old gel-kote is just weight, plus who doesn't like to get sweaty and covered in dust for a few hours?? Ahhh

Wednesday, November 4, 2009

Rigger Mortis Part 2

For the halyards I used "Dinghy Control" by Robline. I like that it comes in small diameters and has a bright-colored UV resistant dyneema core.


Main halyard.


It's nice to have a line that I can taper. The covered portion is great for gripping those classic lido mast-base cleats.


...And jib halyard


I made some prototype jib sheets by throwing a dyneema core inside a polyester cover.


I wanted to minimise friction in tacks so I decided a continuous line in front of the mast was the way to go. So I spliced some vectran into a "y" shape, inserted the arms into the main jib sheet, and secured them with a deep bury and some whipping.


For the whisker pole, I added an extra cross-over to the splice and reinforced it with a twine lashing.


Perfect fit!


Secured to sail.


This is a good prototype set, probably good for medium and heavy air. I have some more refinement to do with line types and diameters.